Professional Printing. Effortless Experience.

Empower your office and creativity with HP & Canon’s latest printers.
Stunning color, business speed, and reliable wireless — the future of printing is here.

🚀
Blazing Fast Prints
Up to 36ppm on select models
đź’ˇ
Stunning Color
Canon’s FINE & HP Vivid tech
📱
One-Touch Wireless
Mobile and AirPrint ready
🌱
Low Carbon Tech
Energy Star & 40% less power

Step-by-Step Printer Setup Guide

Click Printer Setup for step by step guidance on how to setup, configure and register your printer.

Easily set up your printer by following these simple instructions.

Download the Latest Software
Download the most up‑to‑date drivers and printer software compatible with your system.
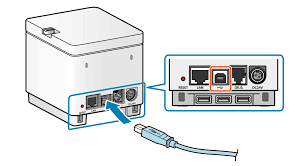
Connect Your Printer
Link your printer to a USB cable or Wi‑Fi via the printer’s wireless setup options.
Install the Printer Drivers
Follow the on‑screen prompts to complete the setup process.
Test the Printer
Once installation is complete, print a test page to confirm your printer is working.

Step 1: Reconnect the USB Cable Properly

Ensure a secure physical connection between your printer and computer.

  1. Unplug the USB cable from both the printer and the computer.
  2. Wait a few seconds before reconnecting.
  3. Firmly plug the cable into both ends.
  4. Restart the printer installation process.

Step 2: Test the USB Port Functionality

Make sure the USB port you're using is working correctly.

  1. Try connecting the printer to a different USB port.
  2. Alternatively, test the current port by connecting another USB device.

Step 3: Use a Different USB Cable

A faulty cable might be the problem.

  1. Swap the existing cable with a known working or new USB cable.
  2. Reconnect the printer and computer, then restart the setup.

Step 4: Disconnect Unnecessary USB Devices

Too many connected devices can cause conflicts.

  1. Unplug all non‑essential USB devices (e.g., external drives, cameras).
  2. Keep only the mouse, keyboard, and printer connected.
  3. Retry the installation.

Step 5: Perform a Printer Power Reset

A quick reset can restore USB communication.

  1. Turn off the printer and unplug it from the wall.
  2. Wait at least 60 seconds.
  3. Plug it back into a direct wall outlet and power it on.

If the setup resumes automatically, proceed with installation. Otherwise, run the installer manually.

Step 6: Update Drivers via Device Manager

Ensure the correct drivers are in place.

  1. Open Device Manager from the Start menu.
  2. Expand “Printers” or “USB Controllers”.
  3. Locate your printer, right‑click it, and choose Update driver → Search automatically for drivers.

Step 7: Uninstall Previous Printer Software

Old or conflicting installations may block setup.

  1. Go to Control Panel > Programs > Uninstall a Program.
  2. Find and uninstall your printer software.
  3. Reboot your computer before reinstalling.

Step 8: Clear Temporary Files

Clean out junk files that might interfere with installation.

  1. Search for and open Disk Cleanup.
  2. Choose your system drive (usually C:).
  3. Select appropriate file categories and click OK to remove them.

Step 9: Perform a Clean Boot to Disable Interference

Eliminate background software conflicts.

  1. Open System Configuration (search “msconfig”).
  2. Under the “General” tab, select Selective Startup and uncheck Load startup items.
  3. Go to the “Services” tab, check Hide all Microsoft services, and then disable the remaining services.
  4. Restart your computer and run the printer setup again.

Solutions for Printer Software Support

Are you experiencing issues with your printer software? We provide knowledgeable assistance with updates, troubleshooting, and installation.

Live chat

Live Chat Assistance

Connect with our team through live chat for step‑by‑step guidance in real time.

Support agents

PC Packard Printer Help

Get clear, easy‑to‑follow support for installing software, updating drivers, and resolving common issues.